In the previous post, “CDN — The Basics — Part 1”, we got as far as looking at the situation where a load ballancer is employed in front of a set of identical web servers, and the DNS is handled externally by a dedicated DNS server, potentially in a different cloud/region/data center. As it has been the case so far with this topic, we’ll look at how this structure can be improved and look at incremental changes that can be made to increase reliability (and as such uptime). We will get to the CDN bit too eventually, don’t worry 🙂
In the last showcased diagram in the previous post in these series, we have looked at scaling the web app horizontally by adding more servers and have a load ballancer in front of them. This allows us to scale nearly infinitely the web application by adding more webservers. However, since all requests have to go through the load ballancer, this creates a bottleneck — as much as a single point of failure. (Neither of those are desirable, needless to point out!) So to overcome that, there are multiple ways of dealing with this — but each one of these methods relies on the same idea: add more load ballancers in the setup!
One way of doing so, is by having a standby load ballancer. This is assuming your load ballancer is not a bottleneck and can take 10,000’s of requests per second, however, you don’t want it to become a single point of failure. The idea is very simple: have all the time an identical load ballancer setup the same as the “live” one on standby — when the “live” load ballancer fails, the standby takes over and replaces the live one, transparently; this gives you a chance to fix/replace the failed load ballancer without affecting incoming traffic.
However, even the standby load ballancer setup supports a few variations!
One of them involves using a virtual IP assigned to both load ballancers (live and standby) and allow these machines to decide in between themselves which one of them takes ownership fo the VIP. One way of allowing them to do so is via a heartbeat daemon which periodically checks the other machine’s sanity: if the live one goes down, then the standby system will take ownership of the address and start processing incoming requests, otherwise, while the live system is down, the standby does nothing but keeps checking the heartbeat:

As per before, we assume the DNS resolution is offloaded onto a different service/server, in a different data center. The DNS resolution basically points www.myserver.com (your domain name) to the VIP (x.y.z.t) and from there on the 2 load ballancers will manage the “ownership” of the Virtual IP in between themselves based on the heartbeats exchanged in between them.
One of the issues with this is that the heartbeat signals are sent at regular intervals in between the load ballancers — if one of the load ballancers goes down in between heartbeats, you will lose traffic until next heart beat kicks in, since one machine won’t know that the other one is down. Therefore is important to keep these heartbeats at very short intervals — however “very short” is something that needs to be addressed on a per-case basis: if you are taking 100 requests per minute, this means just under 2 requests per second, so half a second interval makes sense; however, if you are taking 1,000’s of requests per second, you probably want to tune that down to a milisecond or so! Also bear in mind that decreasing the interval also has the side effect of increasing your CPU consumption (since every N minutes/seconds/miliseconds your station will execute code to send and process the heartbeat) and also if the heartbeat-ing is done via the network, you will incur a higher network traffic on the internal LAN — that could end up flooding your network with packets and prevent you from processing the actual “proper” packets. So one has to strike a balance in between not losing traffic and not wasting resources in this case.
That is one approach — another approach is to allow the DNS server to do the heartbeat-ing and decide which one of the 2 load ballancers to send the requests to:

As you can see, in this case, each load ballancer has a real IP address facing the internet. The DNS service has both of these IP addresses registered and it constantly checks which one of the servers is up and when enquired about a DNS resolution, it decides to resolve www.myserver.com (your domain name) to the load ballancer that it knows to be live.
In the above example, starting fresh, both load ballancers are up, with load ballancer 1 being the preferred one. Client 1 asks the DNS service to resolve www.myserver.com — the DNS service “knows” (based on the sanity checks it performs regularly) that load balancer 1 is up, and as such resolves www.myserver.com with the load balancer 1 IP address: a.b.c.d. Client 1 goes and connects directly to load ballancer 1 (though not knowing it is talking to a load ballancer, that is all transparent to the clients of course!) and from there on normal HTTP communication and balancing occurs. Client 2 comes online and enquires the DNS service about domain name www.myserver.com — at this point the load ballancer 1 is still up and live, so it gets the same IP address resolution: a.b.c.d — and as such it connects to load ballancer 1 and starts the HTTP standard communication. Right after client 2 finishes, load balancer 1 goes offline — shortly after, the DNS service registers this so when client 3 comes and asks for a DNS resolution for www.myserver.com, it receives the IP address of load ballancer 2, which is known to be up and running so it receives an IP resolution of x.y.z.t (the IP address of load ballancer 2). Same for client 4 and client 5. If at any point load ballancer 1 comes back online, depending on the configuration, the DNS system might decide to resolve from there on www.myserver.com back to a.b.c.d (IP address of load ballancer 1) or stick to using x.y.z.t (the IP address of load ballancer 2) until load ballancer 2 itself goes offline.
The DNS server peforms these checks at certain intervals — as per before one has to strike a ballance of how short or long these intervals should be: too long and you’re dropping traffic in case of a failure, too short and you’re increasing the traffic towards your data center.
The other challenge with this setup, occurs due to the caching of DNS resolutions — the “time to live” (TTL). Each domain-to-ip resolution is cached by the clients for an indicated TTL period — this prevents the clients from performing a DNS resolution on each request (that will add countless seconds to the overall communication chain and degrade the user experience). That decreases pressures on your DNS service as well as increases system responsiveness — however, a high TTL value could end up losing you traffic! In the above example, Client 1 has been “resolved” the domain name www.myserver.com to IP address of load balancer 1 (a.b.c.d) — let’s say that the TTL for this resolution is 5 minutes. This means the OS / kernel running on client 1 will cache this mapping for 5 minutes and will not look up www.myserver.com in this interval; if during these 5 minutes load balancer 1 goes down, client 1 will keep trying to connect to a.b.c.d and time out — it’s only 5 minutes later that the mapping expires from the internal cache and client 1 will perform a new DNS resolution (at which point, if load balancer 1 is still down, it will get the IP address of load balancer 2, so x.y.z.t for www.myserver.com — and from there on be able to connect to your system correctly).
You can decrease the TTL to say 1 second – this will however mean that you will flood the DNS server with requests as pretty much every single request will have to be preceded by a DNS lookup, this provides a very quick failover in the case one of the load ballancers goes down, however, it increases the overall time taken by the client to connect to communicate with your system (since each request, as stated, needs to be preceded by a DNS lookup).
However, there are advantages to this setup: one being that you don’t have to implement the heartbeat-ing yourself and configure it — typically just allowing the DNS service to send ICMP packets (ping) to your load ballancers is enough. (As a side note the advantage of ICMP packets is that it’s not TCP-based, it works on top of IP straight away, so you’re not increasing the number of TCP connections to your load ballancers — which typically has an impact on the buffers in the kernel.) Also, this system allows for more complex failovers: for instance, the heartbeat could be more complex that simple pings, the sanity check/heartbeat could for instance enquire about the system load on the load ballancers, and decide to switch in between the load ballancers when the system load reaches a certain amount (rather than when the balancer goes down), thus ensuring a smoother operation of your system. (That is based on the fact that processing requests under load typically takes longer than processing a request on an “idle” system.)
Also, this setup allows for you to scale up to as many load ballancers you want, since you can add an unlimited number of load ballancers in this diagram and fail in between them. (Obviously you will be limited about how many IP addresses for load ballancers your DNS service allows you to set up.)
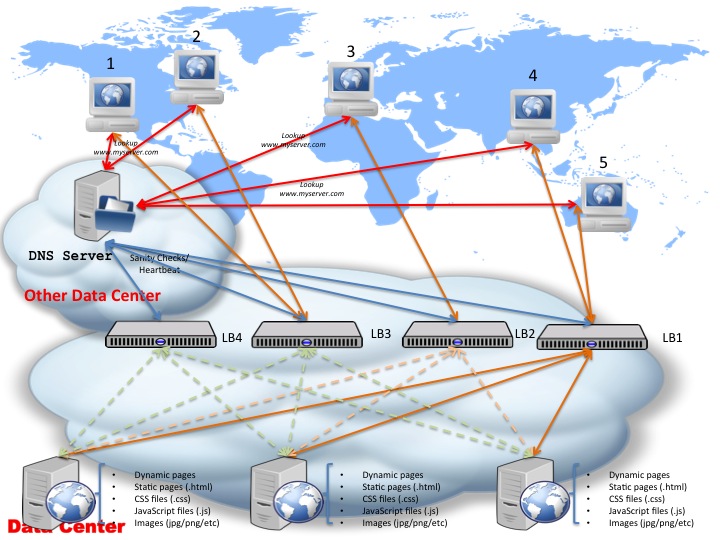
As you can see in the above diagram I’ve added 4 load ballancers, all registered with the DNS service — the DNS service checks as before regularly each one of them for heartbeat and can fail over from one to another — so you have more than one load ballancer to failover to. (Needless to say this improves your system uptime since even 2 or 3 failed load ballancers won’t affect the capacity of your system to still respond to requests.)
In the next part I’ll be talking about how this structure can be evolved from a live/standby to a live/live (or live/live/…/live) setup to increase your scalability and uptime. And yes, we’ll get to the CDN bit, trust me 🙂