 At Netflix, we made a name for ourselves for being a Java shop. A quick look at our Netflix OSS page on Github reveals a whole suite of projects all Java-based. However, apart from the Java projects that are going on in Netflix – and the JVM-based projects (we DO Groovy and Scala too!) – we also started rolling out internally Node.js. I’m going to talk in this post about a (part of a) such project in Node.js that I had to put together in Netflix.
A bit of context first: I work in the Ads Engineering group in Netflix, we spend a lot of effort in building tools to help our marketing folks build a better and more personalized advertising experience for our targeted users. As such, we use various channels for pushing our marketing messages – including Facebook, Twitter and so on. For each one of these we have different handles for various things such as Netflix originals (I’m sure you’re all following @HouseOfCards right? ;), different territories (we try to message our users in their own language and for that we set up different handles for each language to provide a less confusing experience for our followers) and so on. Suffice to say we have a lot of Twitter handles – and pushing messages through these handles manually stops being an option soon as the number increases. So recently we thought it’s time to automate some of these aspects – and that’s how this (sub)project started.
We have currently a set of background applications which can easily create and distribute messages through the Twitter channel, however, having so many Twitter handles means we have to grant access to the application for each handle. Of course, one such way to do it is by implementing support for Twitter’s OAuth and have someone log into each handle and go through a “Sign in with Twitter” or similar process to grant such access. However, this is too manual – and presents the problem that every time we introduce a new app internally which is meant to have access to these handles we have to grant all accounts access to it – which is, of course, tedious and error prone… So rather than do that, why not automate this a bit? And this is how we’re getting to Node.js finally.
A lot of these apps as I said are running in a background, with no user interface attached. This means in order to provide a “Sign in with Twitter” I have to put effort into implementing an UI for each one of them — which is a lot of work to just grant it access to Twitter accounts. Instead, I thought, why not use Twitter’s own PIN-based authentication for this? After all it was designed exactly to address such applications!
Twitter PIN-based authentication
A quick look through Twitter’s PIN-based OAuth implementation shows it to be rather straight forward: given a consumer key and secret pair for our application, we place a request to Twitter and generate a token. This token is then used to assemble an URL; our Twitter user (who is already logged into Twitter) physically opens this URL in the browser window and then they are prompted to authorize the application to access their Twitter account. If they choose to proceed with this and grant the app access to their Twitter account, a page is shown with a generated PIN number – this PIN needs to be (manually) fed back into the application to make a one last call to generate the OAuth auth_token and secret pair.
If you look at the above sequence you can see there is a lot of manual “work” there: the user has to log into Twitter first in a browser window, then once we pass it the URL we generate they have to visit the URL, click on the corresponding button to authorize our app access to their account, then retrieve the generated PIN and pass it back to us. We were talking about automating this at the beginning of the blog post so all these manual operations disappear – but instead it seems taking this route just added up more manual steps!
That could be true if it wasn’t for node.js and its huge ecosystem of modules which come to the rescue.
Nightmare.js
Some of you might have heard of Phantom.js, which is an awesome tool for page automation amongst other things. As such, at first glance, one idea would be to employ a bit of node.js and Phantom.js magic to achieve all the ping-pong PIN authorization. And that could probably work, to be fair.
However, the problem with Phantom.js as I found is that before you know it you end up in callback hell, as every single function it exposes in the API pretty much requires a callback. That makes code very muddy for me and difficult to follow – not to mention maintaining it.
Instead, if you are looking for a very elegant solution for browser automation, I suggest you consider Nightmare.js – it eliminates all the callback hell from Phantom.js and allows you to write sequential code for page automation and processing. Even better, it sits actually on top of Phantom.js so we still have a lot of the powerful tools from the framework – such as traversing the DOM via a server-side jQuery-like syntax for instance.
OAuth
Having decided on the navigation side of things, it’s time to turn our attention to the OAuth mechanism which Twitter requires. A quick look in the npm registry and we find out there’s already a module oauth which supports this.
This package has been built for a generic OAuth mechanism, however, it has been tested specifically against Twitter and a bunch of other OAuth providers – which means we should be good to go with this.
The idea now is simple:
- We use the OAuth package to authenticate against Twitter and generate the URL which the user needs to open to grant us access
- We then switch to nightmare.js and use this to navigate to Twitter and log in the user via username + password, the same way they would log into any browser
- Once logged in we then navigate to the URL generated by OAuth module at step 1. The first thing to do here is to click the “Authorize” button – this will then take us to the PIN screen.
- On the PIN screen pick up the PIN presented to the user and pass it back to the OAuth module.
- Using the PIN from step 4, the OAuth module will then generate the oauth_token and oauth_token_secret which we need from there on to operate against the Twitter account
Configuration
To tie all of these together, and get it a bit closer to a useable app, we will add a few more functionality to our node.js app:
- We’re going to add a configuration file which stores all of our Twitter handles details – mainly the login details
- We will use the same file to store the auth_token and auth_token_secret obtained for each handle using the above approach. This way the auth details are being saved for later use – by us or any other app which has access to this config file. To deal with reading and writing this configuration I have chosen the nconf package – this allows for configuration file to be read/written using a JSON format. This makes it easy to inspect with the naked eye and helps with debugging, using a format as follows:
{
"accounts": [
 {
  "handle": "handle",
  "password": "stuff",
  "oauth_token": "abc",
  "oauth_token_secret": "xyz"
 }
],
"consumerKey": "key",
"consumerSecret": "secret"
} |
- While JSON format for a configuration file is nice and easy, a lot of the Java apps still carry with them the burden of the properties file format. To allow for easy support of such apps (I might have to integrate the output of this app in the future with some older apps from our stack which don’t “speak” JSON after all!) I have decided to add support for exporting at the end the run all these settings in properties format.
Since the properties format does not allow for hierarchical data structures, I opted for a small hack here and decided to store the data as follows:
############# # Twitter Handles # ###################
twitter.handles=netflixusa,livtwitter

twitter.netflixusa.consumerKey=
twitter.netflixusa.secretKey=
twitter.netflixusa.accessToken=
twitter.netflixusa.tokenSecret=

twitter.livtwitter.consumerKey=
twitter.livtwitter.secretKey=
twitter.livtwitter.accessToken=
twitter.livtwitter.tokenSecret= |
Where:
- twitter.handles = CSV of all the twitter handles configured in the properties file. Note that while recommended (to avoid confusion), the handles don’t have to correspond to actual Twitter handles. The term handle is used loosely here and it really means a suggestive name of the account. For instance NetflixUSA is valid, even though the actual Twitter handle is a different one – however, in this case, NetflixUSA will be used in logging.
- For each handler, there will be a section containing:
twitter.<handle>.consumerKey twitter.<handle>.secretKey twitter.<handle>.accessToken twitter.<handle>.tokenSecret |
Running the app
Now let’s string it all together.
Configuration
As I said, we will use nconf module to read/write settings, so to read the file and get access to the accounts array (see above JSON format), we simply have to do this:
nconf.use("file", {file: confFile}); nconf.load(); var accounts = nconf.get("accounts") |
This gives us an array storing all of the login details – so we can now iterate through each one of them and apply the above steps for logging into Twitter and generate the PIN. This is what the processAccount function is for: given an id in this array it generates the OAuth token and secret after authorizing the application via PIN-based authentication described above.
Generate request token
To do this, is builds an OAuth instance using the Twitter’s own request and access token URL and passes in the application consumer and secret key. Note that Twitter has a few requirements for OAuth – in terms of version to be passed and signing algorithm to be applied and these are all defined as “constants” in the code and passed in when building this instance. In particular, Twitter requires that for PIN-based auth, we pass the callback value to be oob (out of bounds) – any other value and it will trigger the 3-legged OAuth from Twiter rather than the PIN-based one.
Once this is built we then request an OAuth request token – and supply the OAuth library a callback to be notified when completed. The callback will receive the oauth_token and secret to be used for generating the URL the user needs to use for obtaining the PIN. And that’s why once our callback gets notified (and we checked for errors etc) we trigger the PIN procedure – which is implemented in getPin().
Authorize the App and Obtain the PIN
The getPin() function as per above does a few things:
- Logs the user into Twitter
- Navigates to the request URL
- Where it then authorizes the app
- And finally retrieves the PIN
All of this is being run under Nightmare.js. The logging in is rather easy – and in fact you will find lots of Nightmare.js examples about logging into Twitter:
res.goto("https://twitter.com").wait() .type('input[id="signin-email"]', username) .type('input[id="signin-password"]', password) .click('.submit.btn.primary-btn.js-submit') .wait(); |
The code is pretty self-explanatory: we navigate to the Twitter home page, type our username and password in the boxes and click “Submit” then wait for the next page to get populated.

Figure 1: Screenshot after the call to twitterLogin. This shows my own Twitter handle (@liviutudor) which I’ve used for the purpose of testing this. It’s exactly the same screen I see when I log into Twitter normally in my browser.
Note how Nightmare allows us to cascade these calls and build a whole queue of commands to be executed. This is in fact why in the twitterLogin function we save the reference to the Nightmare() instance so we can later on queue more items to it.
Also note that at this stage we haven’t actually performed any browser commands yet – we simply instructed Nightmare.js instance to queue these commands; the whole queue gets run later on, at the end of getPin(), where we invoke run() on the instance.
Once we log the user in, we then have to navigate to the request page and obtain the PIN – this is all handled in the authorizeApp() function which navigates to the request url and clicks “Authorize app” button on behalf of the user:
tl.goto(pinUrl).wait().click("input#allow").wait(); |
How did we know which bit to click on? Well, it turns out that the (relevant) HTML during this step looks like this:
<input type="submit" id="allow" class="submit button selected" value="Authorize app"> |
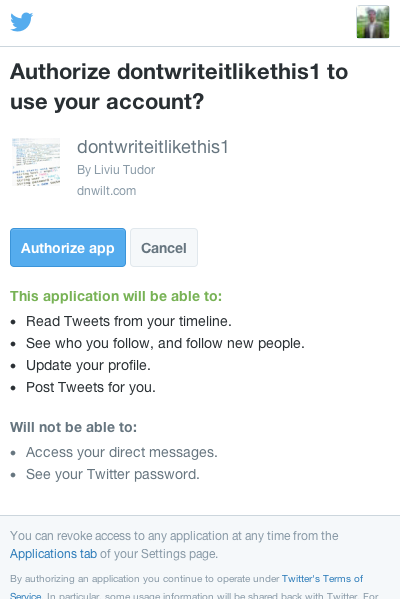
Figure 2: The “Authorize app” screen. In this example I’ve used my own Twitter handle and a made-up app I’ve registered with Twitter.
So since we have a uniqe id on the page (#allow) we decided to use just that.
By the way, as a side note, nightmare.js has this awesome functionality buit-in and very very useful for debugging: it allows you at any point to screenshot the current browser window. So if you want to make sure for instance that your user has logged in correctly, and then that the authorize app screen is reached correctly, you can always sneak in a few calls to screenshot() as it follows:
tl.screenshot(‘after_login.png’).goto(pinUrl).wait().screenshot(‘authorize_screen.png’).click("input#allow").wait().screenshot(‘after_authorize.png); |
At the end of the above chain of calls, you will get 3 PNG files:
- After_login.png – this should show the normal Twitter screen (homepage) that any user sees when they log into Twitter. If we see a different screen here then we surely supplied the wrong credentials and Twitter couldn’t log us in.
- Authorize_screen.png – this should be the screen which prompts the user to authorize the app, it has 2 buttons: “Authorize app” and “Cancel”. If we see a different screen (assuming that the login screen above was correct) we probably built the URL wrong OR our request token has expired. (They have a relatively long lifetime however, they do expire after a few hours, so if you’re debugging your code and it takes you too long you might find this error every now and then.)
- After_authorize.png – this should be in fact the screen which presents the user with the PIN. If we see a different screen here then we didn’t correctly click on the “Authorize app” button in the previous step to give our application access.

Figure 3: The PIN screen. This is the screen presenting the user with the PIN number after the user has authorized the app to access the Twitter account.
Getting back to our app, at the end of the above line we should have the screen which displays the PIN. Investigating this page reveals the (relevant) HTML to be like this:
<div id="oauth_pin"> <p> <span id="code-desc">Next, return to dontwriteitlikethis1 and enter this PIN to complete the authorization process:</span> <kbd aria-labelledby="code-desc"><code>1234567</code></kbd> </p> </div> |
As such, a selector like div#oauth_pin kbd code should select exactly the element storing our PIN and from there we can just retrieve it. How do we do that with Nightmare.js though? We use the evaluate() method which allows us to use our own function in the DOM to retrieve/change/delete values as we sit fit. We simply supply our own function in the call to evaluate() and also supply a callback function which will receive the result of our function. Nightmare will go and run our function in the current context and when it’s finished pick up the result and pass it over to our “result callback” function.
As such all we have to do is implement our function to retrieve just the PIN number and pass it back; however, since we will need also a pointer to the current account we are processing and a few other “session” variables, instead of passing back just the PIN, we’ll assemble a JSON object with the PIN and all the other details and return this. This then gets passed into our “result callback” and from there we can finally generate the auth_token and auth_token_secret for the current account and save them.
As mentioned above, we’ll use the selector div#oauth_pin kbd code to retrieve the PIN and then assemble everything into a JSON object, so our function is simply:
function(idxAccount, idx, oauth_token, oauth_token_secret) { var pinVal = $('div#oauth_pin kbd code').text().trim(); return { idxAccount: idxAccount, idx: idx, oauth_token: oauth_token, oauth_token_secret: oauth_token_secret, pin: pinVal }; } |
From there one, the “result callback” function is even easier:
function(result) { getAccessToken(result.idxAccount, result.idx, result.oauth_token, result.oauth_token_secret, result.pin); } |
In other words, we just pass the call to getAccessToken() which is pretty much the last step in this set of calls.
Retrieve and Store the oauth_token
Having gotten the PIN, we now use the OAuth library to make one last call and pass in the PIN to retrieve the access oauth_token and oauth_token_secret pair. This is done in the getAccessToken() function: simply call the getOAuthAccessToken in the OAuth library and provide a callback which receives this pair:
oarr[idx].getOAuthAccessToken(oauth_token, oauth_token_secret, pin, function(error, oauth_access_token, oauth_access_token_secret, results2) { …. }); |
After this call, our app is now authorized to access the Twitter account. To verify this, go to your Twitter Settings -> Apps and you will see our app now has been granted access:
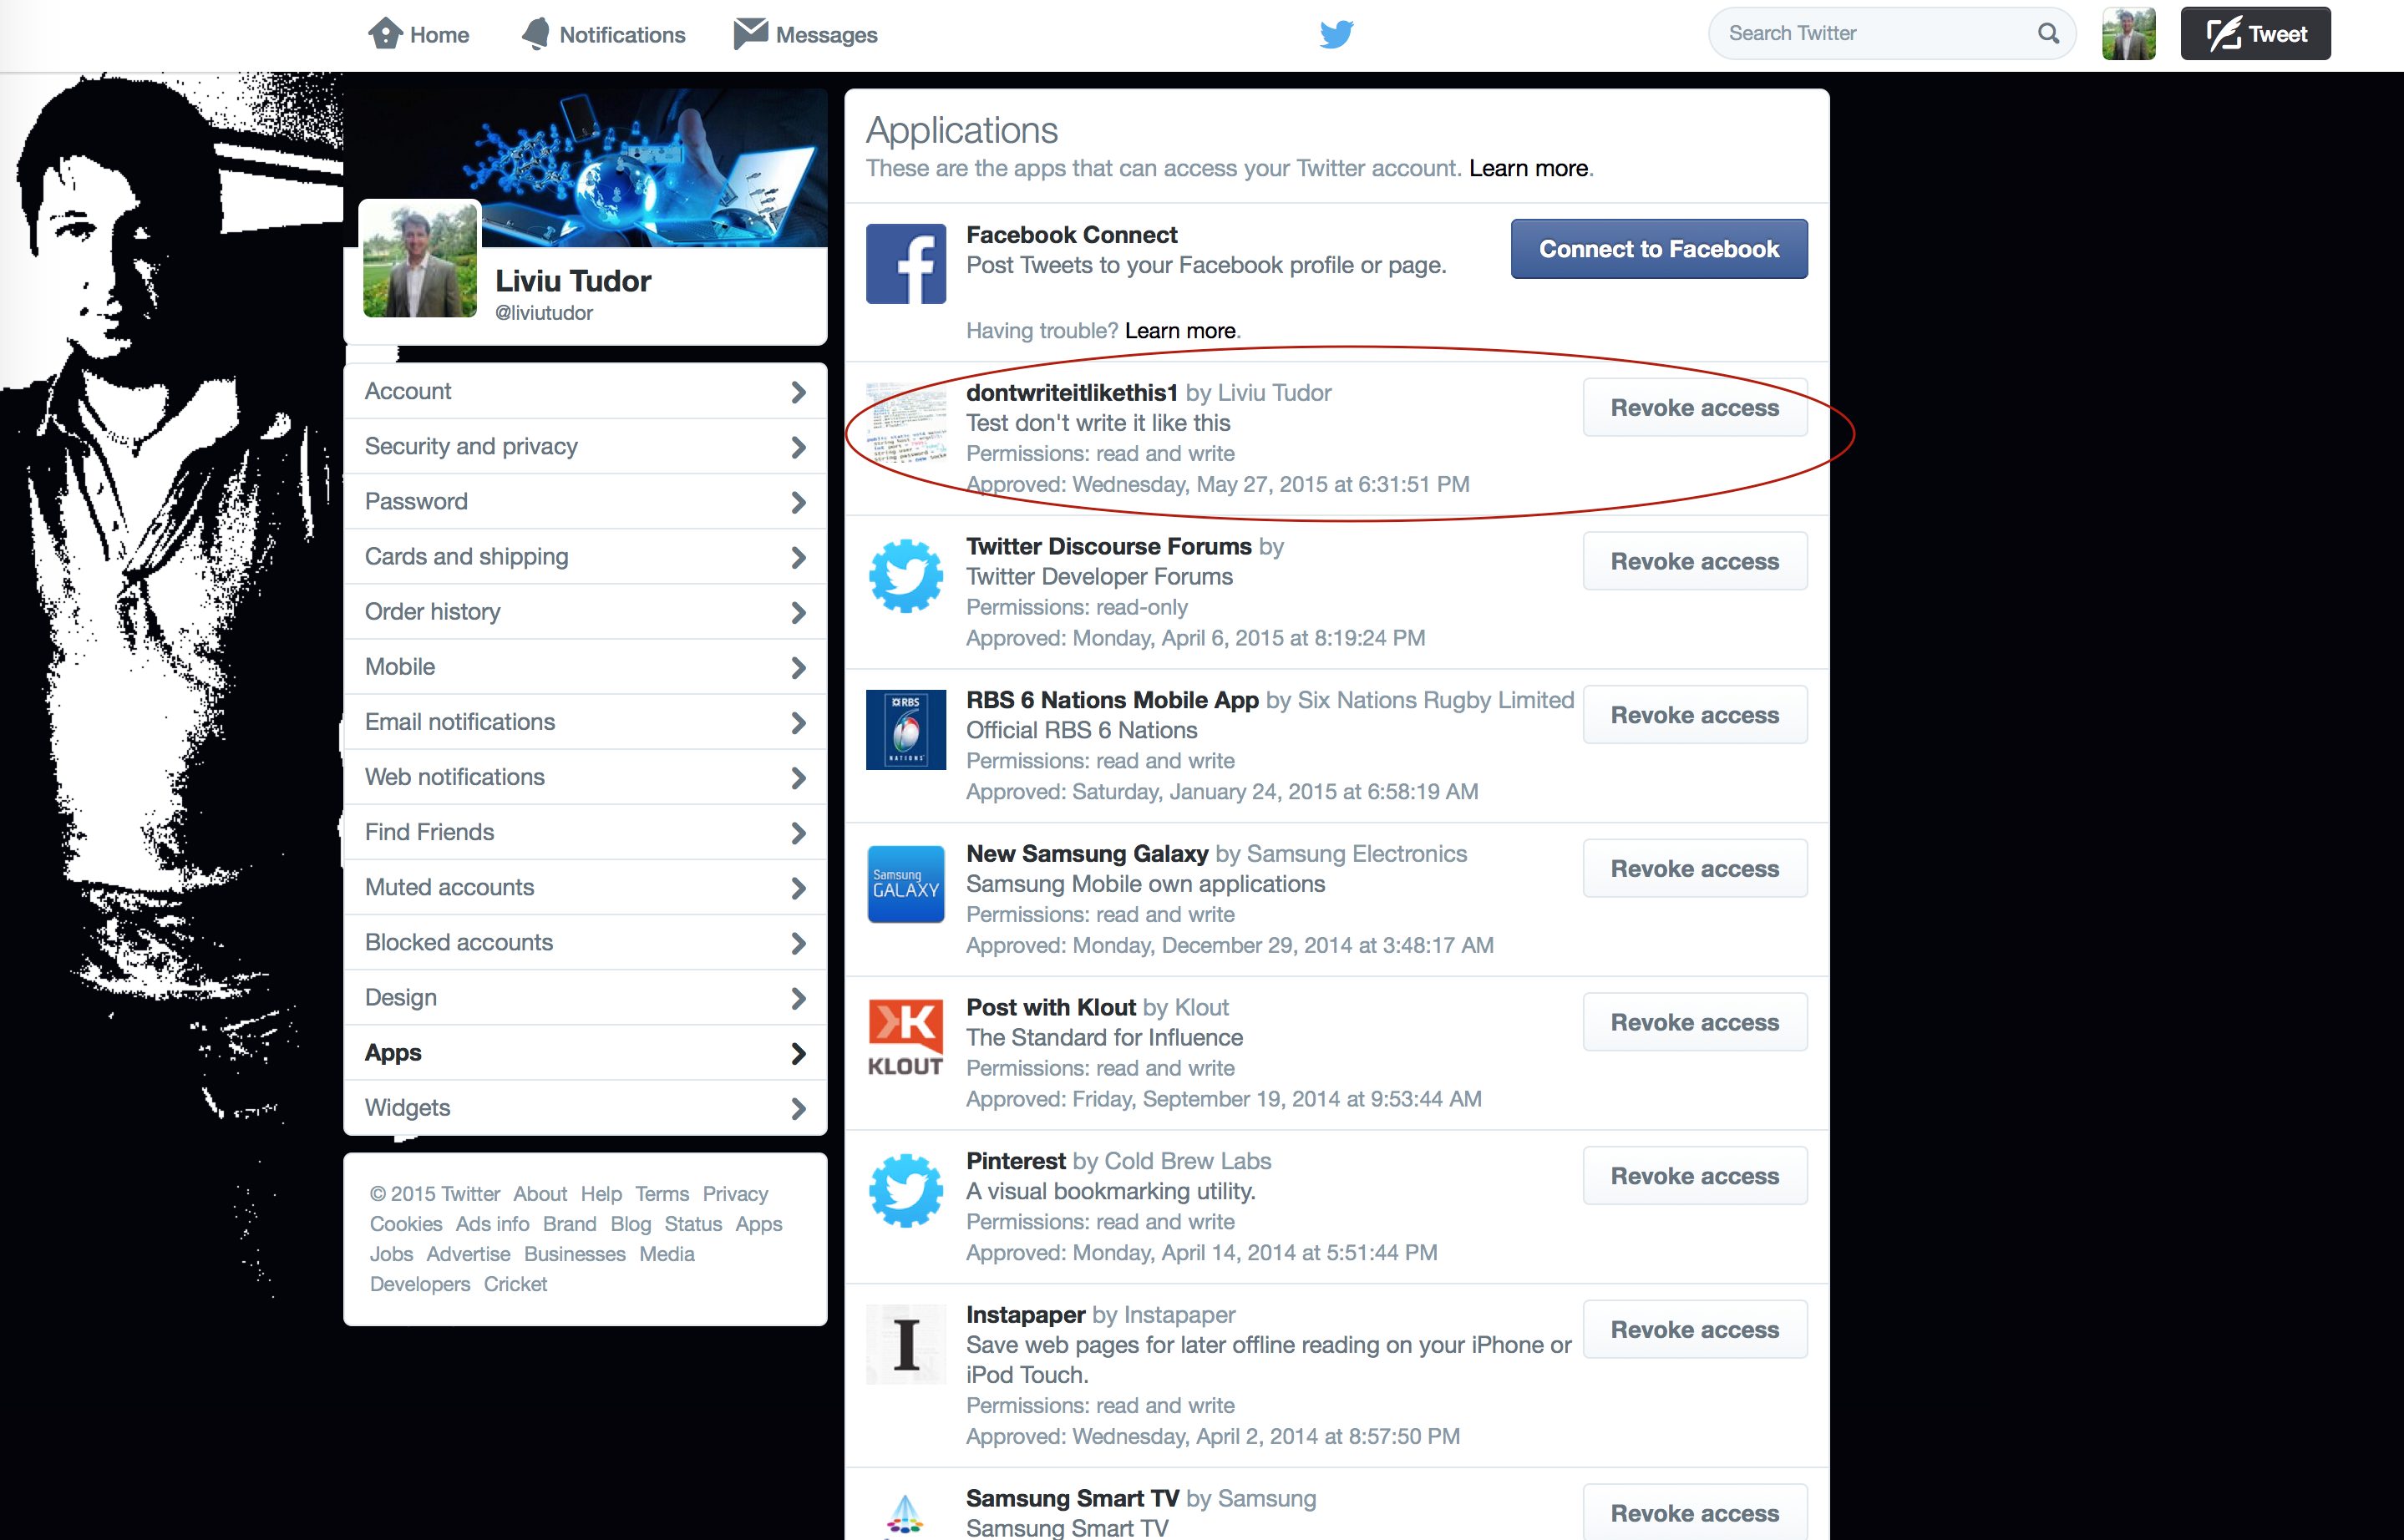
Figure 4. Our app has been granted access to my Twitter account after we pass the PIN back and receive the access tokens.
Note that this token/secret pair has to be stored as we will be using it from now every time we need to authenticate as the app and operate against this Twitter handle. As such our callback function will save them back in the accounts array and call the saveAndGenerateProperties file – which uses nconf library to save the JSON configuration as well as generate the properties file:
oarr[idx].getOAuthAccessToken(oauth_token, oauth_token_secret, pin, function(error, oauth_access_token, oauth_access_token_secret, results2) { if (error && parseInt(error.statusCode) == 401) { console.log('The pin number retrieved is incorrect'.bold.red); return; } if( error ) { //deal with other errors here } accounts[idxAccount].oauth_token = oauth_token; accounts[idxAccount].oauth_token_secret = oauth_token_secret; saveAndGenerateProperties(); }); |
Note: throughout this code, the error handling has been left (intentionally) rather vague. This is because the focus of this article is on how to mix together oauth and nightmare.js to authorize an app and retrieve the access tokens rather than how to deal with all potential errors. You will have to adapt this code (should you choose to use it) to cater for various errors that these frameworks (or the Twitter API) can issue. In particular, in the case of the getOAuthAccessToken, we are only dealing with the case where our code hasn’t retrieved the PIN properly (or perhaps the PIN has expired) – however there are other errors which can come up and you have to deal with them carefully.
The final piece, as it was mentioned before is invoke run() on the nightmare instance – this finally kicks off all the actions we have set up and triggers all these callbacks. The run method itself allows for a callback to be supplied which gets notified when all the browsing tasks have finished – this means that it will NOT notify us when our chain of callbacks finished! In cases where you don’t have any callbacks such as evaluate() calls for instance, the run-callback will called indeed when everything has finished, however this is not the case. We have supplied a pretty basic callback which just informs the user that that the browser activities have finished or not:
tl.run( function(err) { if( err ) { console.log( "Error encountered: " + JSON.stringify(err).bold.red ); } else { console.log( "Browser finished".bold.green ); console.log( "Waiting for all background tasks to finish"); } }); |
You can choose to implement more advanced techniques here – perhaps keep track of what accounts are still being processed and wait for them – but for the purpose of this example this suffices.
Conclusion
Browser automation is a very powerful tool for automating aspects of application setup and maintenance and can save tons of effort if implemented correctly. Frameworks like nightmare.js (and Phantom.js for that matter) make such automation tasks nearly trivial – couple this with the scripting power that node.js offers and the huge ecosystem of libraries out there and we can automate lots of things that currently are performed manually in browser.
Last but not least, this of course would be equally possible in Java – however the effort would be significantly bigger purely because of the lack of browser automation tools accessible from the JVM. As such, I’m not advocating node.js over Java (or vice versa), simply we have to consider the right tool for the right job – and for this scenario node.js proved to be the perfect tool!