I wish I could put a “1 out of N” at the end of this post title, however, I have no ideas how far this will go unfortunately; I do however realise that the more I go into details about this subject the more there is to be said about it. And what I have realized even more recently is that while the general principle is known about a CDN (“it makes your website download faster”?!?!?!) all these details that can shave off easily miliseconds off your CDN setup are not known or are not understood. As such, this post wants to be the first in a tutorial about CDN (Content Delivery Networks) and about various components around them that often get forgotten when planning and setting up a CDN.
It has to be said from the beginning that I am not the definitive authority in this! Part of the reason why I envisage this to be an ongoing tutorial is that I’m pretty sure that I will keep finding out more and more about this subject in time — and as I do learn more I’ll publish more here. It is also worth mentioning that because of this, there are chances I will be missing out certain aspects too — and if you are aware of these, I would so love to hear about these! (Mainly so I can improve on my knowledge in this area, but rest assured that I will publish those facts on the blog too.) So drop me a line and let me know if I missed anything.
As I said, I have noticed recently — based on some work that I was doing recently with Cognitive Match — that the pretty basic principle of a CDN is (sort of) understood: it is supposed to help you in delivering your web content with high(er) performance (that reads lower latency, higher speed etc etc etc). This could be due to the Wikipedia page here: http://en.wikipedia.org/wiki/Content_delivery_network — or due to the fact that CDN’s are very common nowadays, so whether you like it or not you’re going to come across them and hear about them often. Whether because of these or some other reason, the basic functionality of it as I said is understood by a lot of people. However, even so, surprisingly, the reasons behind it and basic mechanisms under the covers are not! Which forces me somehow to start with the very basics and move to the more advanced parts of this — if some of these are too “hello world” like for you, feel free to skip them; based on my findings recently I see definitely a need to go through these.
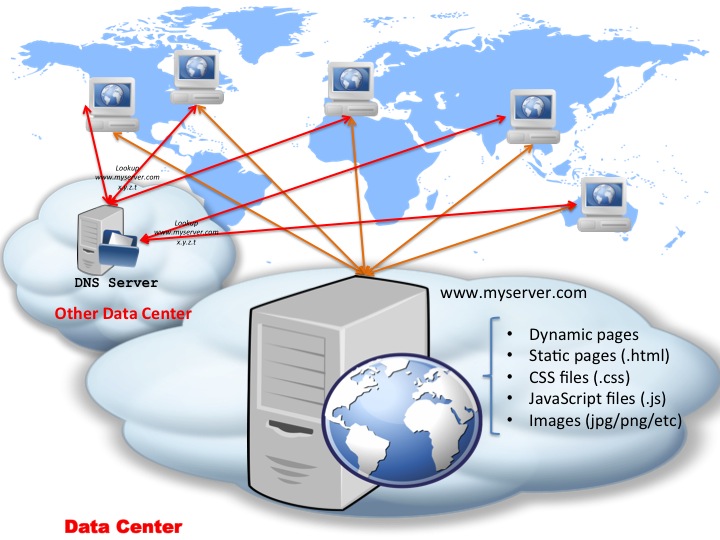
Now before we can look at CDN’s and the why, what and how, let’s step back a bit and look at how web apps started: we have a machine running a webserver, able to serve all the static resources — images, static html files, CSS files. Typically, this machine was able to run some server-side code (CGI, ASP, PHP etc) — and as such produce dynamic content based on that. So all of your content, static of dynamic is all thrown into one server:
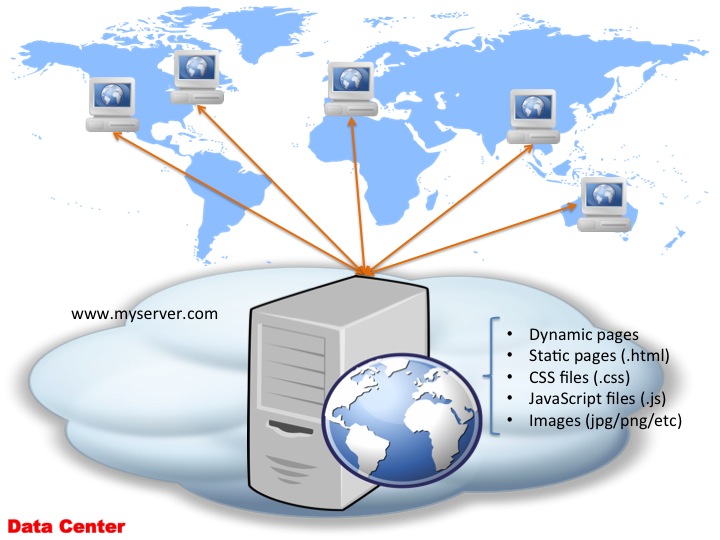
The above diagram I’m sure you would have seen before lots of times — what doesn’t appear in this diagram though often is the DNS bit! So let’s look at this diagram in a bit more detail and see how DNS plugs into this:
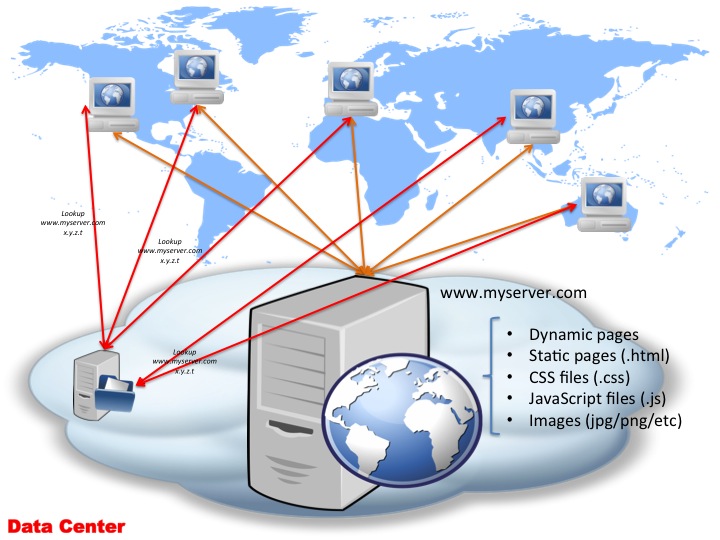
So as you can see in the above diagram, to actually access your webservers, there’s actually 2 things involved:
- Obtain the IP address (x.y.z.t in this example) for www.myserver.com — this is done via a DNS server lookup
- Connect to x.y.z.t and request the page
After the page contents (HTML) is returned, quite likely there will be subsequent requests to your server for things like images embedded on the page, static JavaScript files, CSS files etc. While these will be referenced using URL’s off your www.myserver.com domain (e.g. <img src="http://www.myserver.com/img/a.jpg"/>), at this point your browser has already performed the DNS resolution for www.myserver.com and “knows” this maps to IP address x.y.z.t so it doesn’t have to perform another DNS lookup. (How long the browser — in fact the whole machine — caches the server name to IP address mapping is dictated by the TTL set in your domain zone file — typically this is set up to something like 24 hours or so, so a client only has to lookup that domain to IP mapping once a day and then safely cache it for 24 hours.)
The above diagram it’s pretty much what your standard web hosting account comprises of nowadays if you go with someone like eukhost.com or godaddy.com or any other standard web hosting provider: you get some web space on a server (typically that is a virtual instance too) and DNS management for the domain name. In such cases, both the DNS server and the actual web server itself are in the same “cloud” or data centre — which is what is depicted in the diagram above. However, the 2 don’t have to be in the same data centre or cloud — this is the case if you register your domain name with a company and have your hosting account with another one; something like this:
This is a perfectly valid setup too – the only difference here is that the clients will have to “learn” 2 different routes (at IP level): one to reach your DNS server and one to reach the server with IP address x.y.z.t (i.e. your webserver hosted at www.myserver.com).
In the “standard” example of a basic web hosting account (for instance when you buy a package to host your own blog), typically the hosting company will have the DNS server and the web server on the same physical machine, so clients “learn” the route to the DNS server during the DNS lookup, then the same route is used to reach your web server. There is no need for the operating system’s kernel to discover a new route to a new host. However, in the case of this second setup, the OS kernel discovers the route first to the DNS server, then once the DNS resolution is performed, it has to discover (and typically cache, depending on OS/kernel settings) the route to IP address x.y.z.t too. So for the very first hit to your web server, the client might incur a higher delay compared to subsequent requests. However, for simplicity we will ignore the timing for discovering the route — as typically this will be down to the kernel choosing one of the network interfaces to send packets through. (It gets more complicated than that when looking at things like sub-netting and multiple interfaces and so on, but since we’re not diving into the whole TCP/IP protocol stack, we’ll leave it at that.)
Now, of course, if your website becomes very popular, you start noticing that your webserver gets overloaded to the point where it starts issuing a lot of HTTP 503 (Service Unavailable) errors or your clients start timing out. You can of course start playing with your server config, increase the number of concurrent connections, eliminate HTTP keep-alives so you can recycle connections quicker, employ the likes of FastCGI (if you’re using CGI), database connections pooling etc. etc. etc. You probably realise it’s time to move away from a virtualized environment or a shared hosting package (if that was the case) and have a dedicated physical box running your website. You might even start looking at faster hard drives (so your reads complete sooner) and obviously faster CPU, more memory so you can cache a lot of the static content of your website directly in memory and avoid disk access… However, these can only help so much with scaling your website until you hit an upper limit.
At which point you look at scaling the website horizontally by adding more boxes in the setup and load-ballancing them:
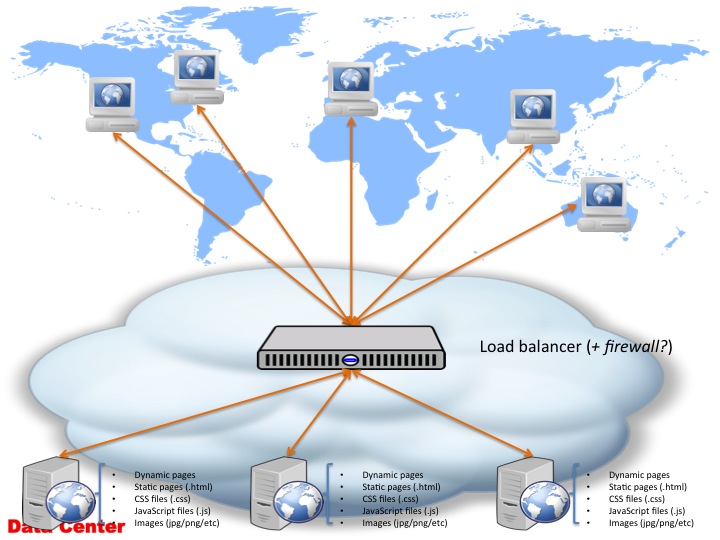
Again, this is not a diagram that you wouldn’t have seen before: it’s a simple setup where you setup N identical webservers, with the same code and content on them and sit a dedicated load ballancer in front of them. While a load ballancer can be easily implemented using the likes of HAProxy or any other software package (there’s quite a few out there), I do recommend if you go down that route you actually use a specialized piece of hardware for this. The reason for this is simple: using a Linux-based + software package to perform the load ballancing is definitely possible, and the cost indeed is low — however, you’re using a Swiss-army-knive to perform the job of a Philips screwdriver: it will get you there eventually, but a screwdriver will help you achieve that much easier and faster. In other words, you won’t achieve the speed (and simplicity) of the built-in firmware, which was built specifically with load-ballancing in mind, by using a generic set of tools like Linux + HAProxy.
Also, more and more of these pieces of hardware include advanced functionality such as a built-in firewall, DoS protection and so on — look at the likes of F5’s BigIP to name just one recent one I’ve worked with. If you stick to the Linux + software package setup, you will have to then start thinking of the likes of iptables or other kernel-level firewall, and start compiling in the kernel all sorts of modules in order to increase your firewall protection. I don’t know about you, but I have compiled the Linux kernel hundreds of times in my Uni years, at the time I thought it was way cool and I convinced myself that my system was working faster, but nowadays I look at that as premature optimization — once I get my setup complete and I’m definitely sure that no other configuration can improve my throughput, I will eventually consider compiling the kernel with/out various modules.
Don’t get me wrong, I’m not an advocate of load-ballancers — I have my own issues with them, for instance employing a load-ballancer to scale an application to thousands and thousands of servers for instance denotes a bit of a design problem, since you are moving the scalability demands from your applications and servers to the load ballancer itself! However, they do serve a purpose when you are looking to scale a simple website from 1 machine to 20-30-40 machines (or even more). And if you are deciding to take the route of employing a load-ballancer, I suggest you do it right and actually use a dedicated piece of kit for this.
For simplicity though, from now on, I will assume that your scale-up network architecture includes a dedicated load-ballancer (as shown in the figure above), and even though the above diagram suggests also a built-in firewall, for simplicity, we will leave aside the security considerations and assume our load ballancer doesn’t have a firewall — even if it does though it doesn’t make any difference to the diagram above (and the ones following), however, it saves me a few words per diagram 🙂
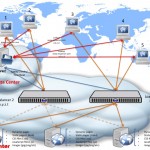
Now, getting back to our load-ballanced setup, the above diagram has been simplified once again so it doesn’t show the DNS resolution. If we add that — let’s make things interesting and assume that the DNS server is in a different data center — we get a diagram like the following:
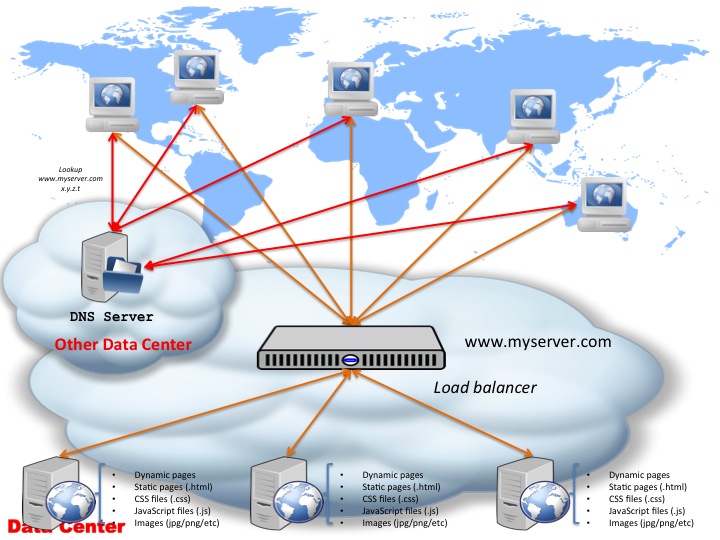
To make things less crowded in the above diagram, I’ve only added the labels on arrows for the first server — the rest DNS-related lookups will be identical for all the other clients (the red arrows).
So what might not have been obvious in the previous load-ballanced diagram, becomes apparent now: the IP address for your website domain name (www.myserver.com) is still x.y.z.t but now it is assigned to the load ballancer itself. To dive into the whole networking setup past the ballancer, the load ballancer has (at least) 2 network interfaces:
- one facing the internet population — this is the one which has the x.y.z.t IP address assigned (the IP address www.myserver.com maps to)
- the second one facing your webservers — typically the webservers and this interface will have an internal IP address (e.g.
192.168...or10.0...)
Internally the load ballancer will perform some NAT to forward requests in between the clients and the webservers — and in doing so it will choose the least-loaded server, or do a round-robin or whatever other load ballancing technique is being used/configured.
As a side note, getting back to the discussion about the firewall + load ballancer combination, if your webservers behind the load ballancer have local IP addresses, then the only way someone can reach your webservers from the internet is through the load ballancer so a simple thing like only allowing port 80 (for HTTP — maybe 443 if you’re using HTTPS as well) eliminates a lot of attacks on your servers!
Since I’ve touched on HTTPS, it’s worth mentioning that if you employ a load ballancer, you’re best configuring the HTTPS certificate on the ballancer itself and let the firmware deal with encryption of incoming and outgoing data — this way your webserver will only send and receive un-encrypted data in between them and the load ballancer, however, you rely on the fact that your local subnet is physically secured in the data centre and no other hardware which can get access to these packets is plugged into this network. Doing this means that your webservers are not going to spend valuable CPU cycles decyrpting/encrypting data for each request/response and spend all of the system resources on actually serving the request. (Again, I’ll make the argument that implementing all this encryption/decryption in firmware will be faster than doing it through software.) However, let’s stick to basic (unecrypted) HTTP for now — though adding HTTPS into the diagram doesn’t change a thing, whether the decryption is done at load ballancer level or not.
So far I am aware I haven’t mentioned the CDN bit yet — that will come, rest assured, like I said, I felt it is important to dive into all of these details first since some of these are often either misunderstood or not understood at all. In the next post in this series we’ll be looking at what the issue is with the above load-ballanced setup and how to improve this diagram for reliability. As we go through all of these we will start introducing the CDN concept too and we will be looking at various ways of employing a CDN in a network setup.